Custom Mahogany Kitchen Build, Post 11: Drawer Slide Install

This is the eleventh post in a series documenting my method of construction for an entire set of custom kitchen cabinets. This series is not intended to be a full how-to tutorial, but rather to show the sequence of steps using photos and commentary. You can find all the posts in the series here. Please comment below or send follow-up questions to jonathan@jmoncton.com.


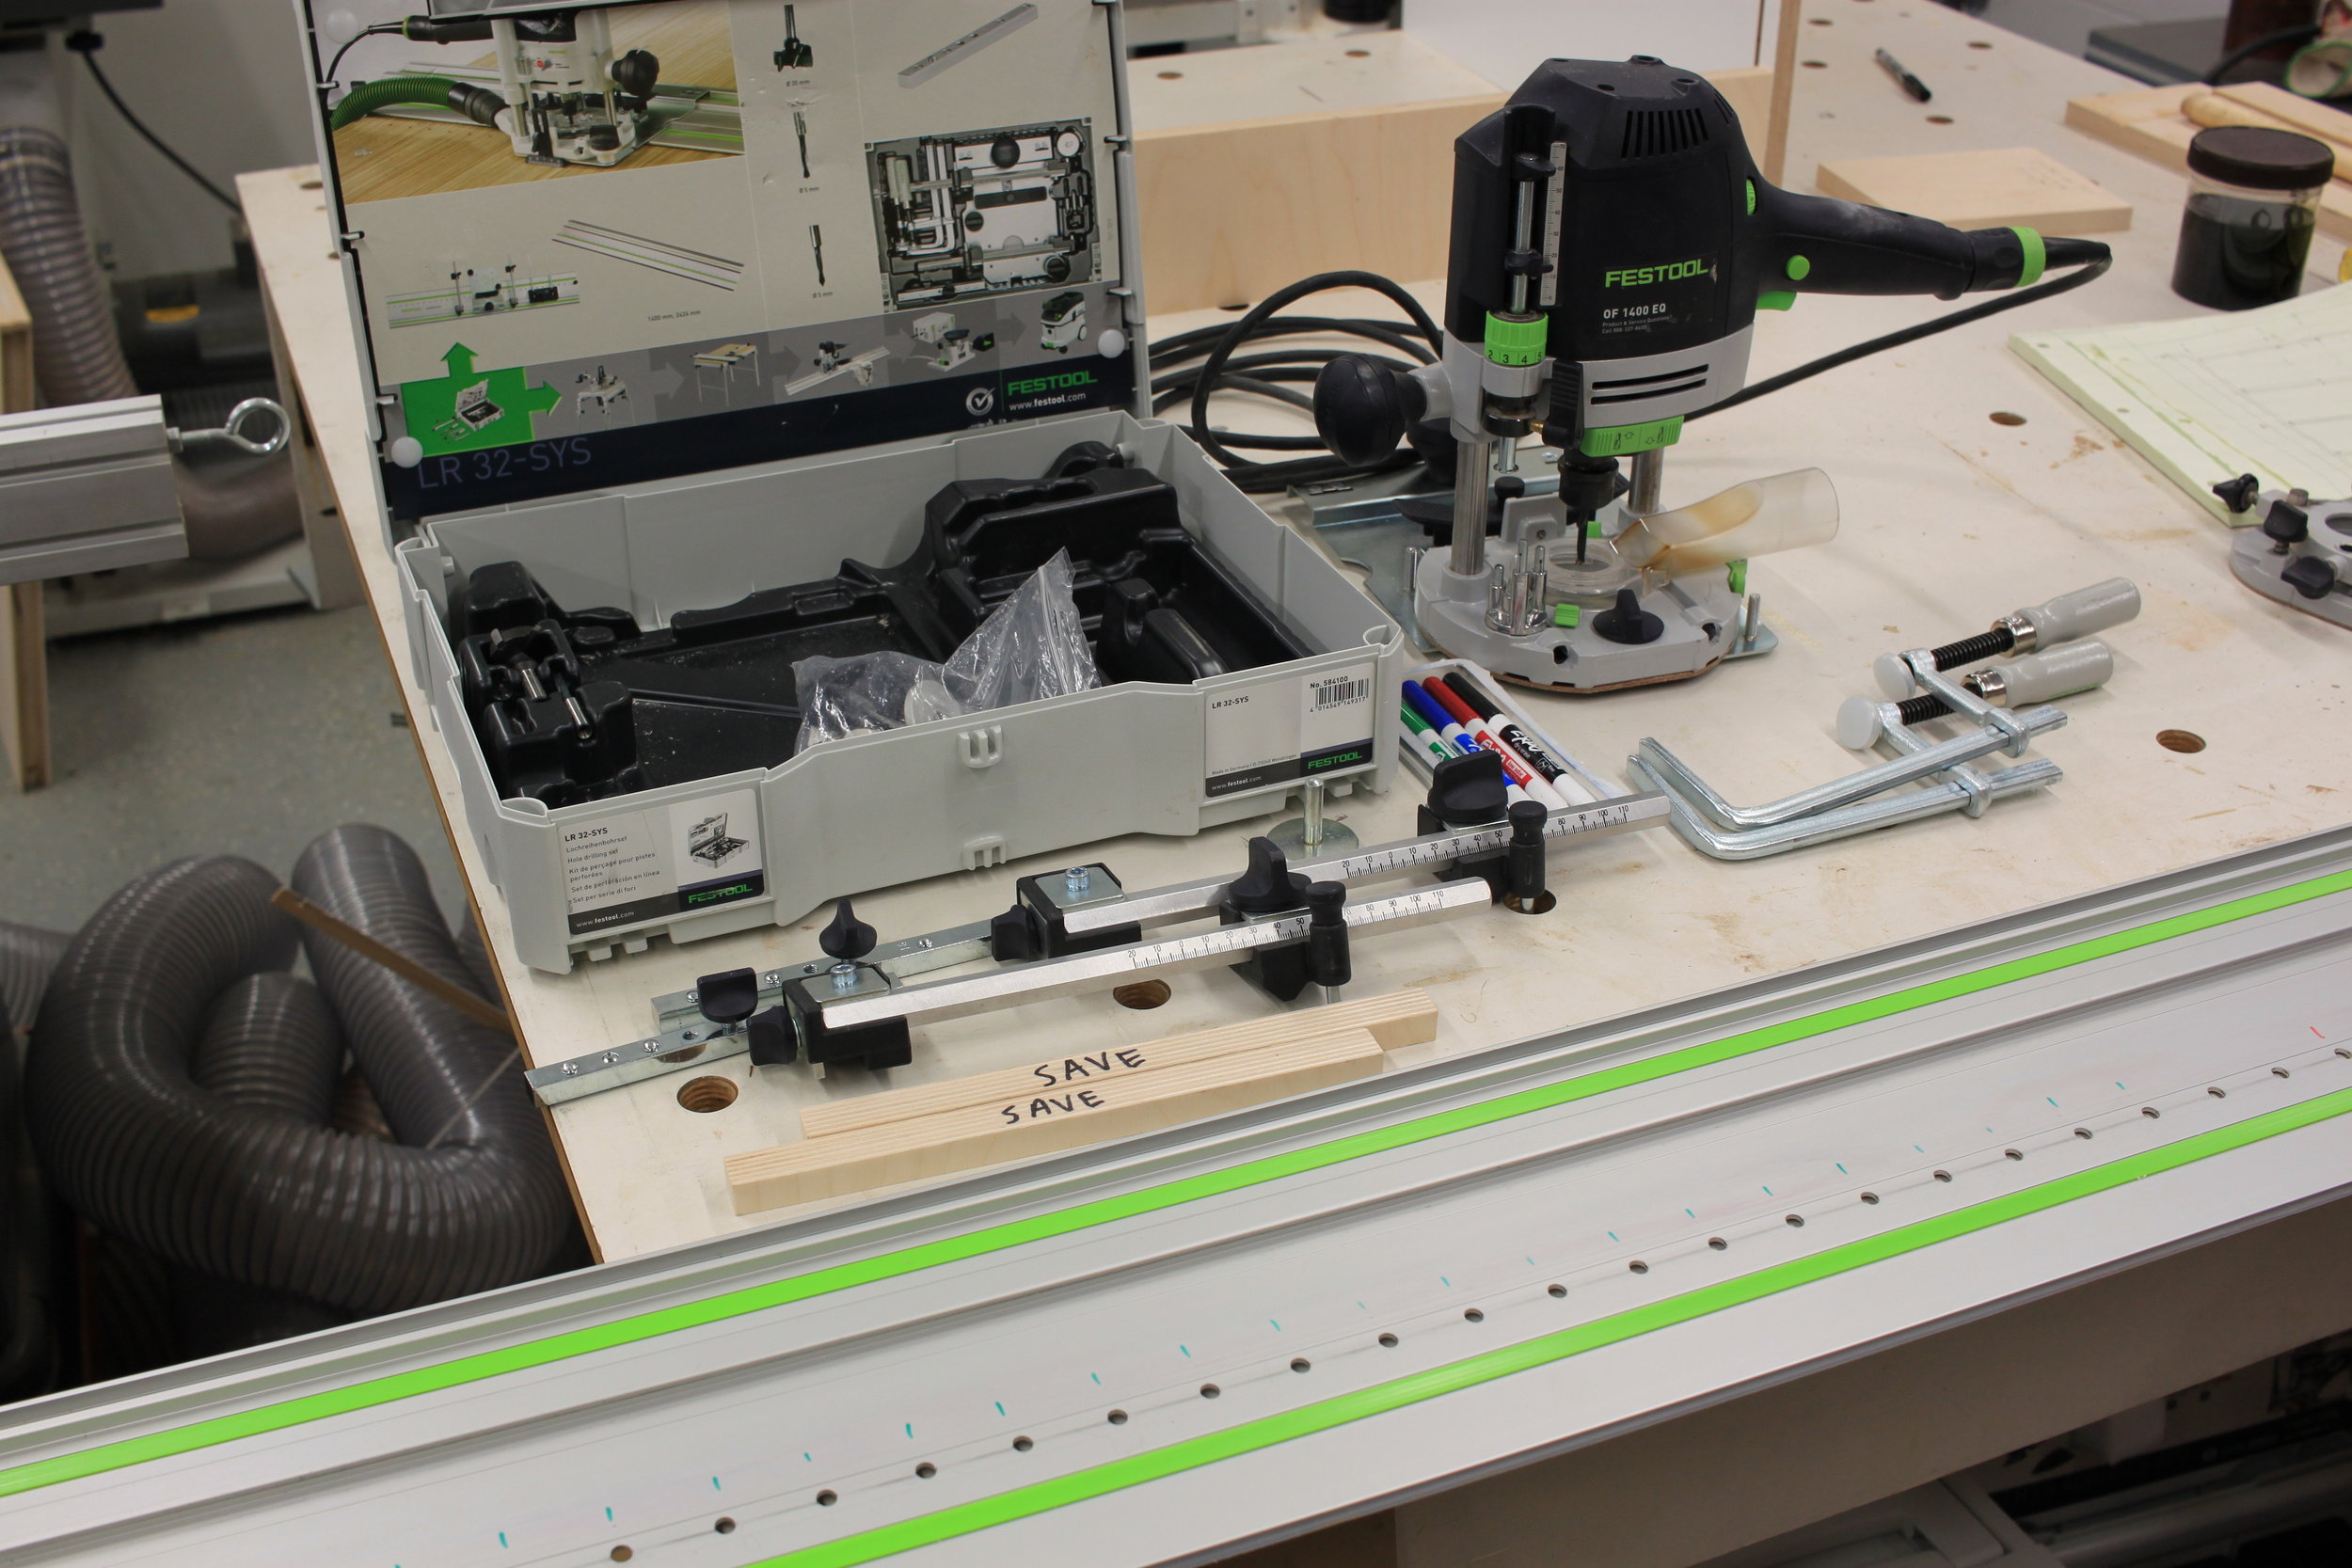
I now will use the Festool LR32 system to locate the Blum Tandem soft-close drawer slides. These are heavy duty, high quality slides that I highly recommend and use on all my cabinet projects.

As it happens, any hole created using the same settings as for the hinge plates will also locate the hole at the proper depth to install these slides. It is necessary to mark on the guide rail which hole and remember to account for which side of the cabinet is being drilled.

The drawer slide can now be placed on the panel and screwed into the hole that was just made using the same mounting screw as for the hinge plates. The screw mounts through the fourth hole in from the edge on the drawer slide, leaving about 3mm between the front of the slide and the edge of the panel.

I square the drawer slide relative to the edge of the panel using my combination square and 24” straightedge.

I drill two more mounting holes, one in the middle and one at the far end. Three screws to secure these slides is plenty. For these I use my cordless drill and a Vix piloting bit. These holes will receive a #6 x 5/8” mounting screw, different from the 6 x 13mm Euro screw used in the first hole.

Thanks for reading. Next I will cut the slot for the cabinet backs with the router. 

Custom Mahogany Kitchen Build, Post 10: Hinge Plate Install

This is the tenth post in a series documenting my method of construction for an entire set of custom kitchen cabinets. This series is not intended to be a full how-to tutorial, but rather to show the sequence of steps using photos and commentary. You can find all the posts in the series here. Please comment below or send follow-up questions to jonathan@jmoncton.com.


Prior to applying the final finish coat I lay out and drill holes for all the hardware that is mounted to the cabinet sides. I will start with the Blum hinge plates – the piece that is mounted to the cabinet that accepts the door hinge.

The Festool LR32 system paired with my OF 1400 plunge router makes this part very simple.

All of the components of this system except the router and guide rail fit in this small box. Before I go further I want to recognize a great source of detailed information on how to use the LR32. Eric at The Poplar Shop is as entertaining as he is informative, at least for a woodworking channel on YouTube.

I start by clamping my panel to the end of my table saw with the panel end overhanging the edge.

IMG_2129.JPG

The LR32 system uses multiples of 32mm as the basis for layout. It works best if the height of the cabinets is in a multiple of 32mm, like this lower base cabinet that will be 768mm tall (32 x 24). Since I make my cabinets with a shoulder, I add these simple spacers that sit in the shoulder on each end to get to the final height.

Next the end stops are installed into the guide rail with the 16 up & out. They are located along the rail so the rail fits over the panel exactly. If the panel is accurate there will be no play in the rail.

The rail is then place on the panel and the side stops are attached to the rail, set at exactly 37mm. This dimension will be the distance from the edge of the panel to the center of the hole that is drilled.

With the side stop pins pressed to the edge of the panel, the clamps are inserted along the track and clamped to the panel.

Once the track is securely clamped, the side stops can be removed. They are only used for locating the rail relative to the edge. Next I prepare the router by first installing the LR32 base plate and calibrating it. Calibration is very simple and instructions are included for this in the box. Then I install the included 5mm brad point bit and set the router depth to the height of these 6.3 x 13mm mounting screws since that is what will be used to attached the hinge plates.

Now I am ready to place the router on the rail and plunge in the appropriate locations, marked in red dry erase marker on the rail. The base plate that has been installed on the router indexes on the guide rail holes.

The brad point bit cuts a very clean hole exactly in line with the holes on the rail, and the dust is all collected.

Checking the hinge plate for fit.

Later this same system will be used to bore the 35mm hole for the hinge, locating exactly halfway between the two hinge plate holes on the cabinet door.

Thanks for reading. Next I will lay out and drill all holes for the drawer slides

Custom Mahogany Kitchen Build, Part 9: Varnishing Panels

This is the ninth post in a series documenting my method of construction for an entire set of custom kitchen cabinets. This series is not intended to be a full how-to tutorial, but rather to show the sequence of steps using photos and commentary. You can find all the posts in the series here. Please comment below or send follow-up questions to jonathan@jmoncton.com.


After the stain has dried outdoors for 24 hours I apply two coats of Pettit marine spar varnish.

This varnish goes on thick and dries to a very durable, high gloss finish. I am just using it here to build up the finish thickness in preparation for the satin topcoat. I brush on the finish using a 3” Jen foam brush. Jen is the only brand of foam brush I use – boxes of them are available on Amazon or other distributors.

The two coats can be applied about 8 hours apart. Below you can see that the grain is not completely filled. Were this a table or desktop I would continue to build the coats three at a time, sanding in between each set, until the grain is completely filled. Since this are the insides of cabinets, that is not necessary.

After the varnish has cured for a full 24 hours, I sand the panels with my random orbit sander at 320 grit to smooth the surface, creating a cloudy appearance in the process.

Thanks for reading. In the next post I will use the Festool LR32 system lay out and drill all holes for the hinge plates, shelf pins, drawer slides and other hardware.


Custom Mahogany Kitchen Build, Part 8: Staining Panels

This is the eighth post in a series documenting my method of construction for an entire set of custom kitchen cabinets. This series is not intended to be a full how-to tutorial, but rather to show the sequence of steps using photos and commentary. You can find all the posts in the series here. Please comment below or send follow-up questions to jonathan@jmoncton.com.


I don’t always stain, but when I do I use this oil-based gel stain called Jel’d Stain. To achieve an authentic mahogany color I mix equal parts of the Brown Mahogany color with the Red Mahogany color in this ice cream container. I love both Talenti ice cream and their containers.

I rub one coat of stain in with a rag and wipe off the excess with another rag. The resulting color on this already reddish-brown wood is really beautiful.

And a closeup.

This stain should dry for at least 24 hours before finish is applied.

Thanks for reading. Next I will apply the finish to these same pieces

Custom Mahogany Kitchen Build, Part 7: Trimming Edge Banding

This is the seventh post in a series documenting my method of construction for an entire set of custom kitchen cabinets. This series is not intended to be a full how-to tutorial, but rather to show the sequence of steps using photos and commentary. You can find all the posts in the series here. Please comment below or send follow-up questions to jonathan@jmoncton.com.


There are a number of ways to remove the excess edge banding material. By far the best method I have found is using my little Festool MFK700 router shown below.

With the zero-degree base, the bearing guide, and the edge trimming bit installed, this tool makes quick, accurate, safe, and dust-controlled work of removing the excess wood. I adjust the cutter height to leave just barely a thumbnail of trim remaining above the plywood. The green dial next to my thumb allows the height to be adjusted by tenths of a millimeter. This tool is a major timesaver for me.

Next I begin sanding each panel using my Festool RS2E ½ sheet sander. The outside of each panel I sand at 100 grit and stop. That will get sanded again after the cabinet is assembled. This inside of each panel gets sanded at 100, 150, and 220.

This handy garage keeps my sander and supply of sandpaper close at hand but out of my way when not in use.

Custom Mahogany Kitchen Build, Part 6: Creating Panel Joinery

This is the sixth post in a series documenting my method of construction for an entire set of custom kitchen cabinets. This series is not intended to be a full how-to tutorial, but rather to show the sequence of steps using photos and commentary. You can find all the posts in the series here. Please comment below or send follow-up questions to jonathan@jmoncton.com.


This next step is one of the elements that separates this method of cabinetmaking from many others. I will create a large shoulder on the edge of each cabinet side for the top and bottom panels to fit into. This shoulder will be allow the panels to be glued and screwed together forming a very strong joint.

I will cut this shoulder in two steps on the table saw. After setting the rightmost edge of the blade exactly 20mm from the fence, and setting it 15mm high, I run the panel through the saw, using a push block to press the panel down to the table.

Once both ends of each panel have been cut this way, I install the tall auxiliary fence into the tracks on my aluminum fence since the panels will be run through the saw vertically. I check to make sure the fence is square to the table and set it at 3mm to the right of the blade.

To help press the panel against the fence I have a piece of wood with a shoulder cut out of it. This avoids putting pressure on the waste piece that would make it kick back while keeping the panel perfectly upright.

Here is the resulting shoulder after making these two simple cuts.

Now the sides are ready to receive their solid wood edge banding. Here is what it looks like with the banding applied.

While that is being done I cut a notch in the trim on the tops and bottoms to fit with the shoulder I have just cut on the sides. In the picture below the trim on the top piece intersects with the trim from the lower piece. That is the portion to be removed.

This cut is performed in two quick steps on the table saw. Using a stop block attached to my fence, and pushing the piece through with the miter gauge I can make accurate, repeatable cuts in the trim. 

Custom Mahogany Kitchen Build, Part 5: Gluing Edge Banding

This is the fifth post in a series documenting my method of construction for an entire set of custom kitchen cabinets. This series is not intended to be a full how-to tutorial, but rather to show the sequence of steps using photos and commentary. You can find all the posts in the series here. Please comment below or send follow-up questions to jonathan@jmoncton.com.

At this point I am ready to start gluing on the solid wood edge banding on the tops and bottom panels of the cabinets while I do some more work on the sides.

This is my setup for gluing on the banding. It is important to have access underneath the clamping board, so sawhorses are ideal. The clamping board is held securely with a handscrew clamp that is in turn clamped to the sawhorse. 

I apply the Titebond 3 wood glue with a small acid brush on both the banding and the panel edge, covering each surface entirely. The banding rests on a clamping board of scrap plywood. 

The panel edge is then placed on the banding and I apply several pipe clamps. The plywood clamping board both distributes the pressure evenly along the length of the panel and protects the banding from the clamp. 

When the clamps are set, I move the whole assembly out of the way, orienting the glue line vertically so the glue fills any gaps and doesn’t run onto the panel. 

On a warm day, the glue will be dry enough to remove the clamps in about 30 minutes. In the meantime I leave the acid brush in a cup of water so it can be reused. These cheap little brushes can last for many uses if the glue is not allowed to dry in the bristles.

Thanks for reading. Up next I will cut create the cabinet joinery by cutting a shoulder on the side panels


Custom Mahogany Kitchen Build, Part 4: Solid Wood Edge Banding

This is the fourth post in a series documenting my method of construction for an entire set of custom kitchen cabinets. This series is not intended to be a full how-to tutorial, but rather to show the sequence of steps using photos and commentary. You can find all the posts in the series here. Please comment below or send follow-up questions to jonathan@jmoncton.com.


All the visible edges of plywood receive a glued-on, 10mm thick piece of mahogany hardwood. I grab a coupIe of the narrower boards out of my rack and cut the 10 foot pieces down to more manageable lengths with my jigsaw. This is all 4/4 (spoken as four-quarter) lumber, meaning that it is about 1” thick from the sawmill. 

I feed both sides through the planer until the pieces are about 22mm (7/8”) thick. They should be comfortably oversize for the 18mm thick plywood. The excess will be trimmed off later.

I then smooth one edge on the jointer. 

My 20” Jet planer and 12” Delta jointer are large machines for a home shop, especially a small shop like mine. The capacity of these tools makes them worth it for me, but big machines like these are not necessary for making cabinets. A box store “lunchbox” planer will do the trick, and the edge can be cut with a circular saw, jigsaw, or even a hand plane. I didn’t have these tools when I built my first kitchen.

A tool that is indispensable is the table saw. Using a thin push stick I rip as many 12mm wide pieces as I can get out of each board. 

For this cut I switch over to a 24-tooth narrow ripping blade. I really don’t care about the quality of cut here since it will get milled again anyway, and the thin kerf minimizes waste. Below are the two blades I have used so far, with the plywood blade on the right, and the ripping blade on the left. 

Once all the pieces are cut I feed them through the planer on each side, milling them from 12mm to 11mm on one side, and then to 10mm on the other. Here’s my pile of trim from just two boards. This batch should last me for most of the project. 

Custom Mahogany Kitchen Build, Part 3: Sizing the Panels

This is the third post in a series documenting my method of construction for an entire set of custom kitchen cabinets. This series is not intended to be a full how-to tutorial, but rather to show the sequence of steps using photos and commentary. You can find all the posts in the series here. Please comment below or send follow-up questions to jonathan@jmoncton.com. 

Now that all the cabinet sides and tops/bottoms are roughed out, they need to be cut precisely to the length and width. I will address how I determine all my dimensions in a separate post.

With the tracksawn edge against the fence of the tablesaw, I rip the panels down to 5mm wider than their final width on one side. Once all the panels of the same width have 1 clean edge, I set the fence for the final dimension and cut all the panels to final width. I avoid using the tracksawn edge as final whenever possible. I find the quality of cut on the table saw to be better – more plumb, less tearout, and just cleaner. 

For all plywood work I use a $20 Avanti 60 tooth blade. Plywood is tough on blades because of all the adhesive present, so I do not like using my expensive hardwood blades. Also visible in the photo below are my Jessem TS stock guides mounted to my table saw fence. As the piece is fed through the saw, the guides press it both down to the table and into the fence, preventing kickback and helping deliver a smooth, precise cut. 

Once the panels are all sized to width, they can be crosscut to final length. To create that first perpendicular cut I again use my Festool tracksaw along with the Festool MFT/3 work table. This table has a track-holding mechanism that allows it to be adjusted perfectly perpendicular to an edge.

To check for square I use my Starrett ruler and combination square like this:

Some panels exceed the width capacity for this table. Although it can be reconfigured for larger panels, I didn’t want to change the settings on the table. I created this quick setup to square large panels using a few clamps and a pair of 1-2-3 machine blocks.

Once all the panels have one square edge, I cut them to precise width on the table saw. Now I’ve got my stack of panels all cut to exact length and width. This set of parts is for the lower cabinet set only.

Thanks for reading. Up next I will make the solid wood edge banding.

Custom Mahogany Kitchen Build, Part 2: Breaking Down Plywood

This is the second post in a series documenting my method of construction for an entire set of custom kitchen cabinets. This series is not intended to be a full how-to tutorial, but rather to show the sequence of steps using photos and commentary. You can find all the posts in the series here. Please comment below or send follow-up questions to jonathan@jmoncton.com. 


I now need to break down part of the stack of 18mm plywood into the approximate sizes for the cabinet sides, tops and bottoms. For that I use my Festool TS 55 track saw. This saw makes a perfectly straight cut along any length of track and produces very little dust when connected to a vacuum. It also leaves a splinter-free edge along both the kept piece and the drop piece. A 28-tooth blade makes quick work of these cuts.

It is not difficult to create a homemade version of a tracksaw, but the combination of straightness, safety, dust collection, and quality of cut will not compare with a setup like this.

I own 3 tracks for this saw, one 1900mm (75”) and two 1400mm (55”) lengtsh. Since this plywood is 48” x 96” a single rail is not long enough. To connect two rails together I fabricated a pair of steel connectors shown here. 

These connectors work by sliding into the track slots on both rails. When the set screws are tightened, the steel bars separate, locking the tracks in place. I believe this is a superior design to the expensive connectors made by Festool because the fasteners do not press into the track damaging the aluminum. They are very simple and cheap to make.

Here I use my third track as a straightedge to align the two tracks that are to be connected.

The connectors separate when the set screws are tightened, locking the tracks in perfect alignment. 

This is the double length of track laid down along the length of an 8-foot long sheet of plywood. 

Previously, I have spent way too much time figuring out how to most efficiently break down these sheets to create as little waste as I could. This time I used a free online program called Optimalon that I was very impressed with. It is intuitive and without any instructions or glitches I was able to input all the panels that I needed and have it calculate the most efficient set of cuts to make. Below is a screenshot of the first panel layout. 

Here are the stacks of lower cabinet parts separated into sides and tops/bottoms and labeled with the final dimension (in millimeters) they will be cut to. 

Next I will size these panels exactly using both the tablesaw and the tracksaw set up on my Festool MFT/3 panel cutting table.

Thanks for reading. You can read the next post on sizing the panels here.